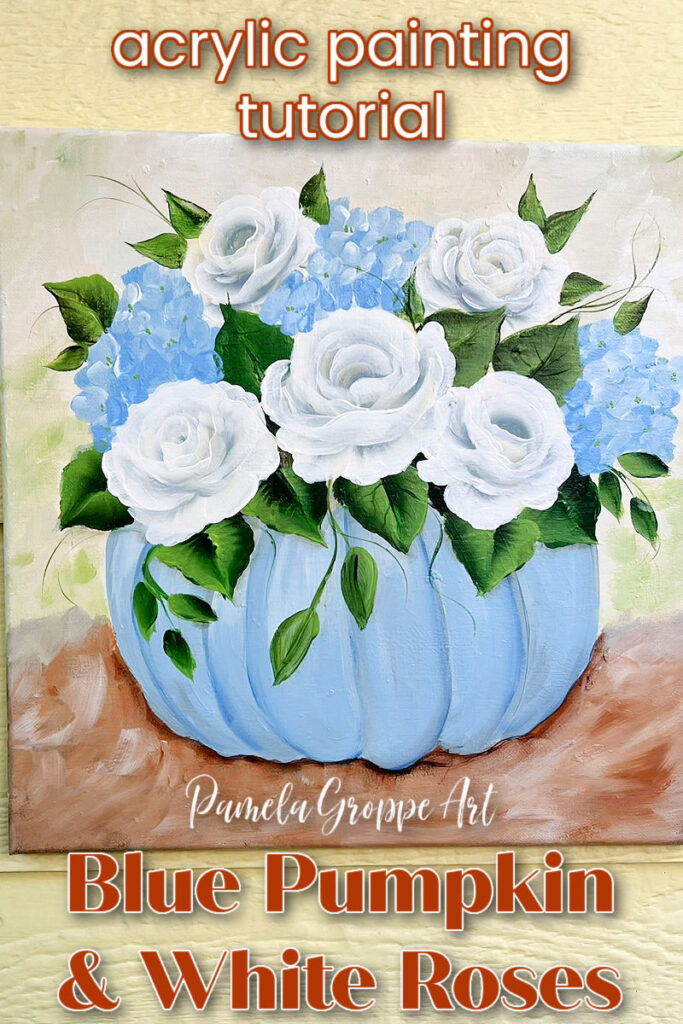
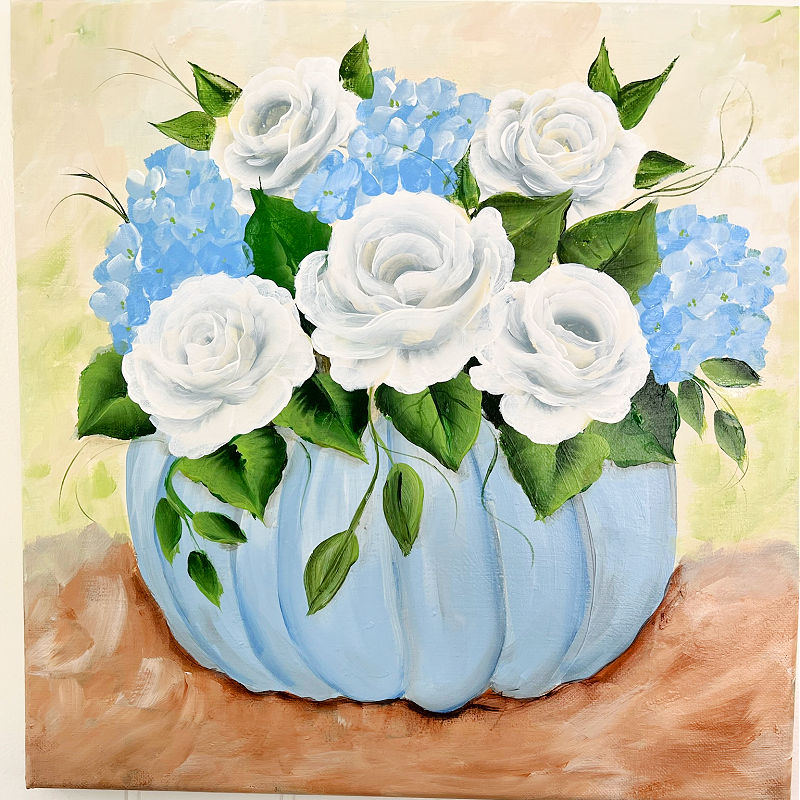
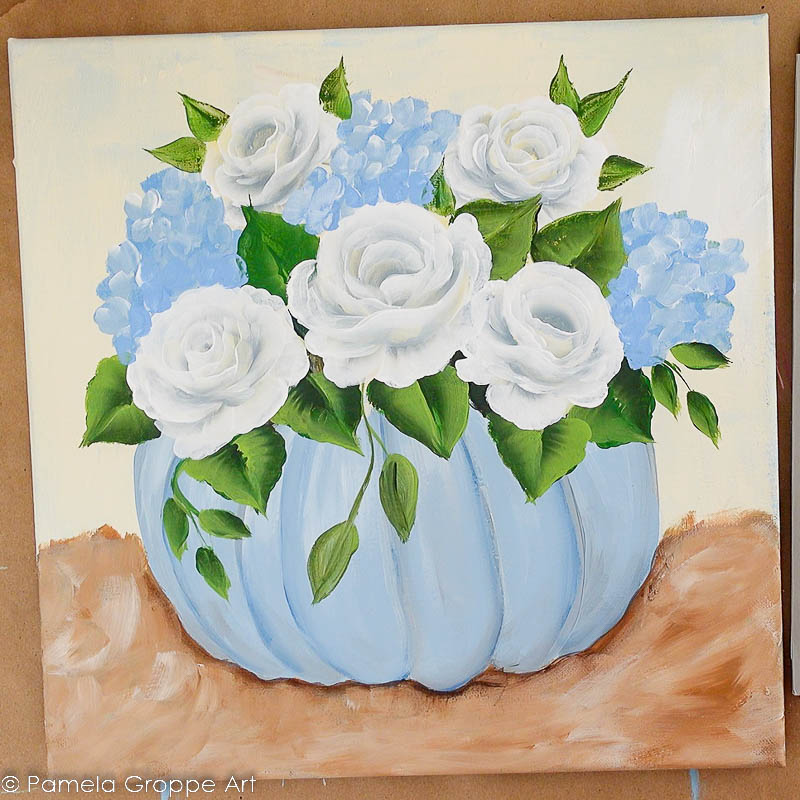
Blue Pumpkin and White Roses – Acrylic Painting Tutorial
Do you love Fall but prefer more neutral colors? This acrylic painting tutorial may be perfect for you. Paint a blue Pumpkin and white roses to create a fun fall, yet subdued painting for your decor!
This step-by-step acrylic painting tutorial of a blue pumpkin and white roses is beginner-friendly and so fun. If you find the stroke roses intimidating, I link to an easier yet lovely rose for you to paint instead.
This post contains affiliate links. If you make a purchase after clicking a link I may make a small commission at no add cost to you.
As always, I tell you that you do not need to use the same colors as I do. What you see on the screen may not be what they look like in real life, each monitor or screen can be different. Colors that are similar will work fine or even different brands of paint will work as well.
Just FYI…Some paints like Craft Barrel or cheaper paints will need more layers as they do not contain as much pigment.
Supplies to Paint a Blue Pumpkin and White Roses
Plaid FolkArt Paint
- Light Blue
- Medium Blue
- Prussian Blue
- Silver Marlin (optional)
- Medium Gray
- Titanium White
- Parchment
- Thicket
- Fresh Foliage
- Licorice
- Burnt Umber
- Cafe Latte
- Light Yellow
Brushes
- Donna Dewberry One Stroke set
- 0 Royal Majestic Liner 4585 (optional, you can use the script liner in the One Stroke set)
Surface
14″ x 14″ wrapped canvas
Traceable Pattern
available below
If you can’t find these exact colors at your local craft or art store then plaidonline.com is a great resource.
Get the Ad free version
Paint a Blue Pumpkin and White Roses step-by-step workbook here!
Want a printable version of this tutorial that is ad free and is yours to keep?
Just hit the button below and it is all yours.
Transfer Traceable Pattern
The first thing you will need to do is transfer the pattern or draw your own likeness of this onto your surface of choice.

If you need help with that you can visit the lesson, How to Transfer painting patterns for a full explanation.
Quick & easy
Transfer Patterns without the mess!
There are a few ways you can transfer painting patterns to your surface but some are time wasters and others are just plain messy. Here is the fastest, easiest way without the dusty mess!
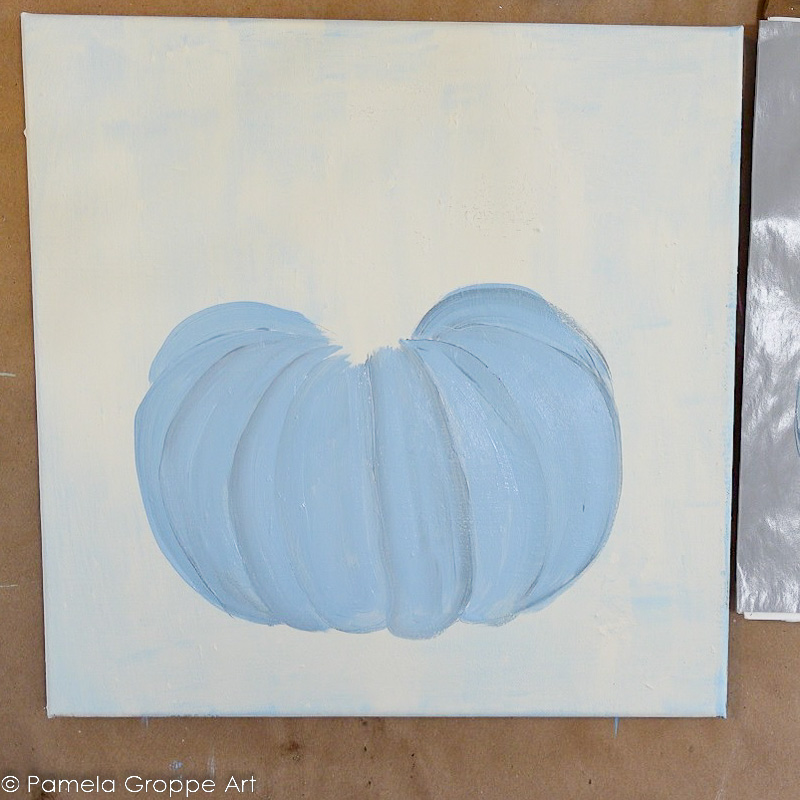
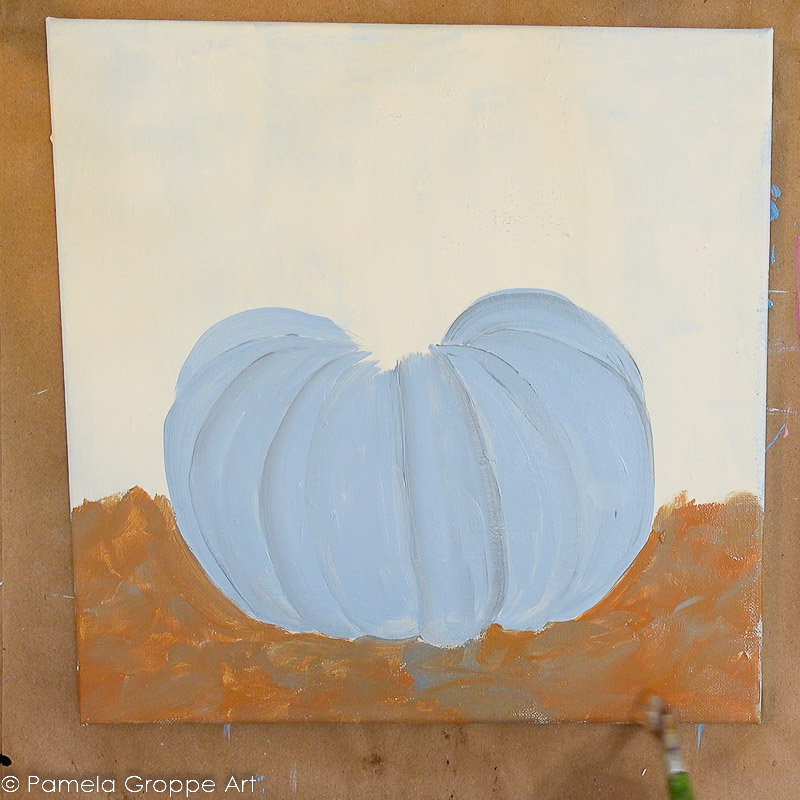
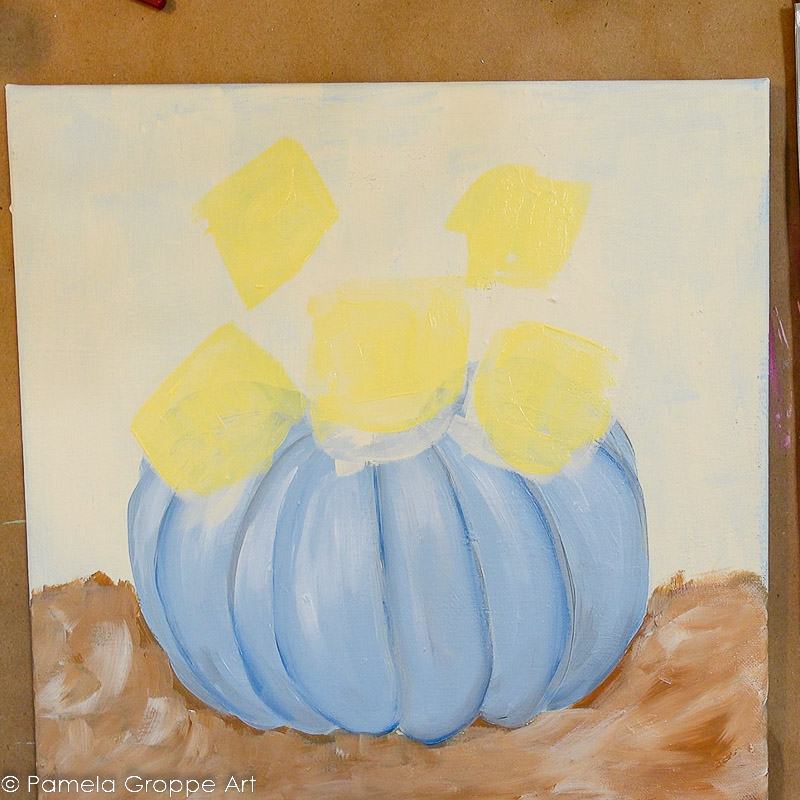
Base Paint Blue Pumpkin
Using the Light Blue and the Silver Marlin double load the 3/4″ or #12 flat with the two colors.
Make sure to load mostly Light Blue and only a touch of the Silver Marlin or gray-blue color you mix on one corner.
You want the ribs of the pumpkin to be faint and not stark lines.
Base Paint Below Pumpkin
Using Cafe Latte and the 3/4″ brush paint in the lower section of the canvas. This isn’t a straight line but just an area.
Slip slap the paint on not worrying about being perfect or opaque.
Bring in a touch of the Silver Marlin color or some blue for a touch of interest.
Highlights and Shading
Using the #12 flat brush pick up some Titanium White and streak it on the pumpkin on the upper portion.
We want it to blend so pick up some Light Blue if you need.
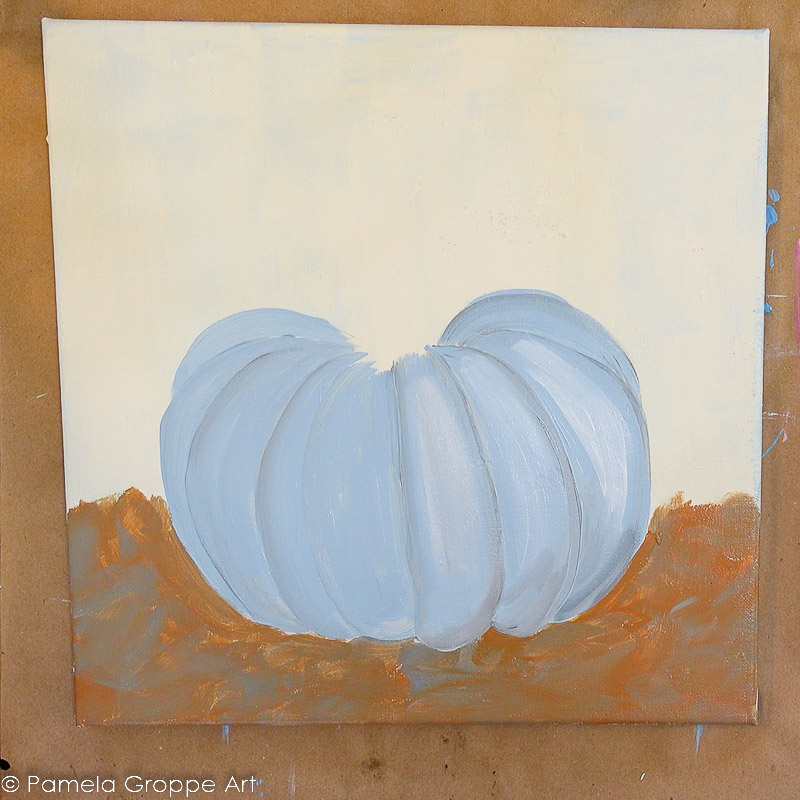
On the bottom of the pumpkin add some shading with the Silver Marlin or gray blue color.
Pull it in lightly, let it blend in, and fade away.
Bring in more white and leave the color chunky but not harsh. Almost dry brush it in. (the video at the bottom of this post will be most helpful if anything doesn’t make sense)
Enhance the Pumpkin ridges
Using Prussian Blue (or another darker blue, no need to be exact) and the #12 flat brush bring in a touch of blue along the ridges of the pumpkin. Don’t create full lines but indications of a little extra shading in some areas.
Load just one corner of the brush with the Prussian Blue.
Go back over the bottom portion of the canvas using the 3/4″ brush Titanium White and Cafe Latte.
Don’t over blend, keep it interesting.
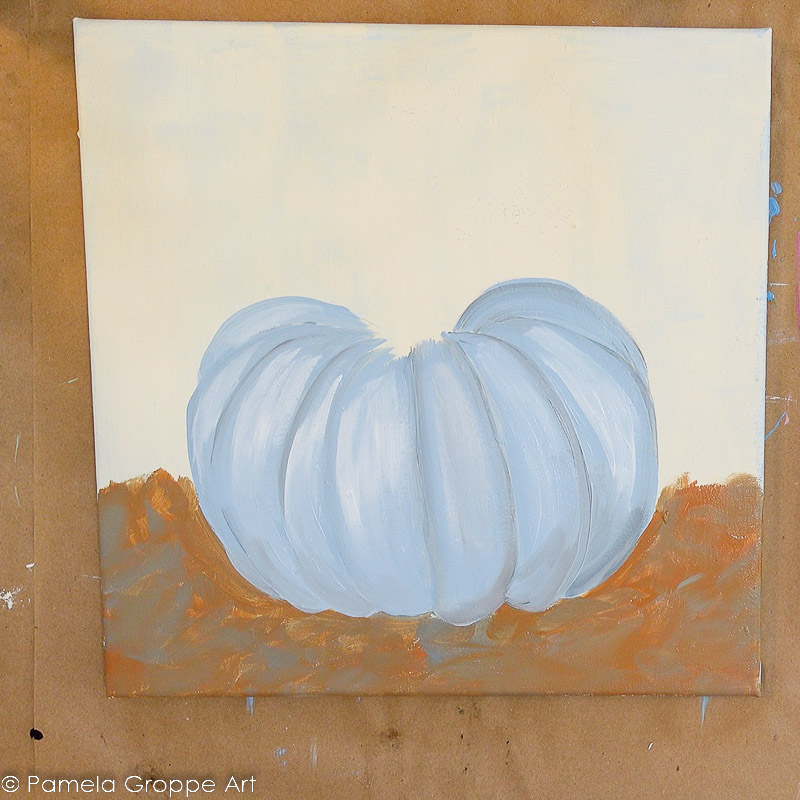
Base Paint Rose
You may have already transferred the pattern of the roses and that is great but I just based in areas for the roses with a Light yellow,
You can base paint your roses with Light yellow too, it just gives them a glow from underneath.
Paint White Roses in the Pumpkin
For the upper roses I use a #10 flat brush to keep them smaller than the lower roses.
Double load the brush with mostly Titanium white then add a touch of Silver Marlin (grey blue) on the opposite corner. The Silver Marlin with try to take over unless you keep it to a minimum.
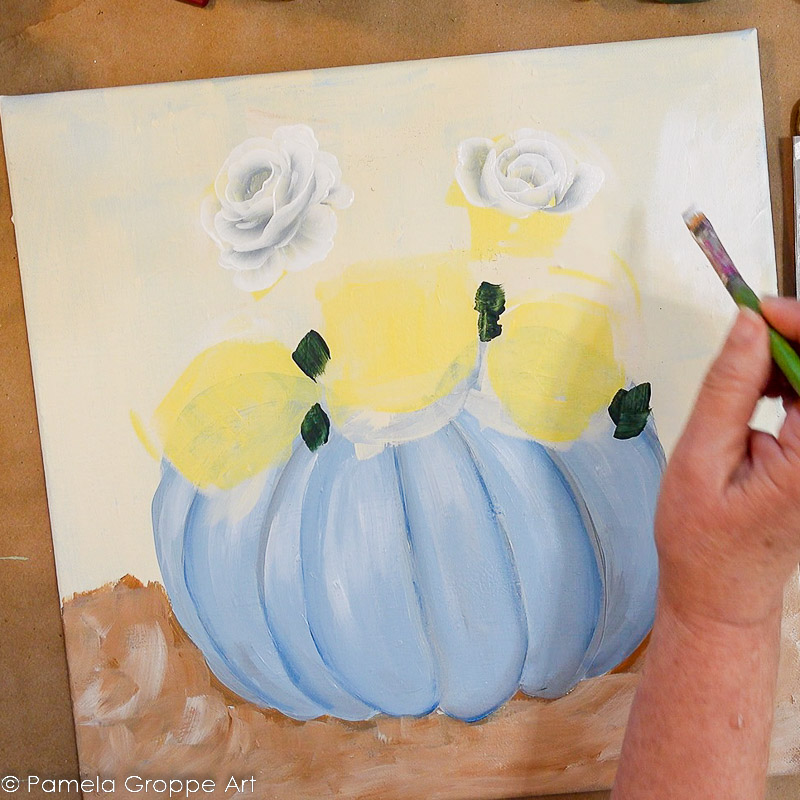
Build the roses in layers. For a deep dive into painting these roses see Paint Pretty Pink roses or Paint Yellow Roses
Are the stroke roses a little intimidating for you? Here is an easy boho rose video that may find much easier while still being very pretty!
Base Paint Leaves
Using the #12 flat and Thicket to base paint the leaves. This will give them more opacity. (I actually used Classic Green but Thicket works just fine for this)
We will come back later and go over them again.
For a more in-depth lesson on leaves, visit How to Paint Leaves
all the best tips and tricks
How to Paint Leaves
Different leaf painting tutorials for you to practice and choose from. Leaves come in all shapes and sizes and I share how you can paint them!
Paint Hydrangeas
Using the Medium Blue and the #12 flat brush, pat in some color for the hydrangeas.
They aren’t perfect circles so don’t worry about getting them just so. You can leave some gaps too.
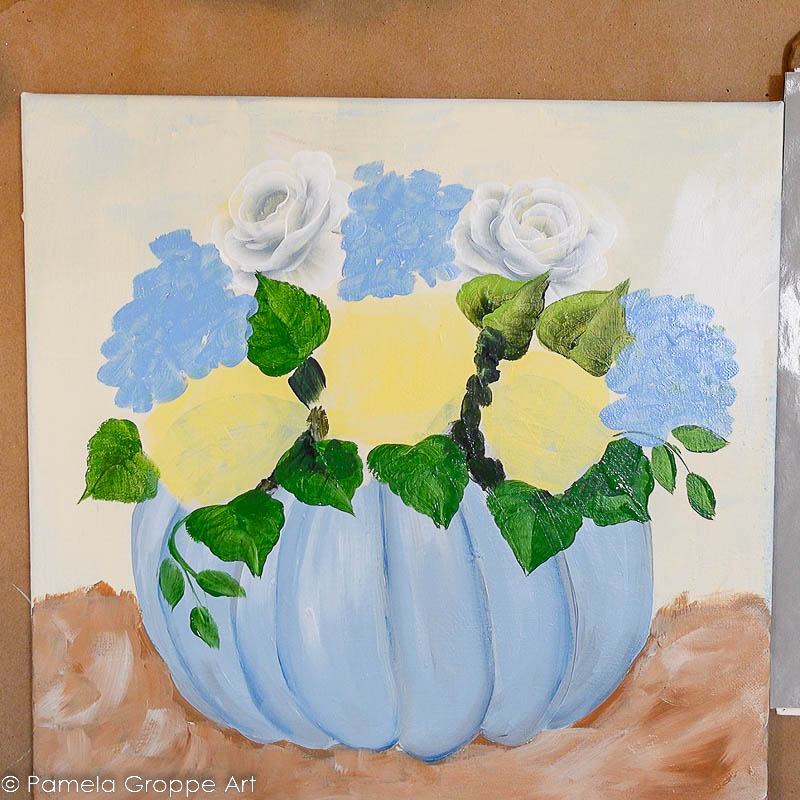
Next double-load the brush with Titanium White and Light blue and paint in some petal shapes.
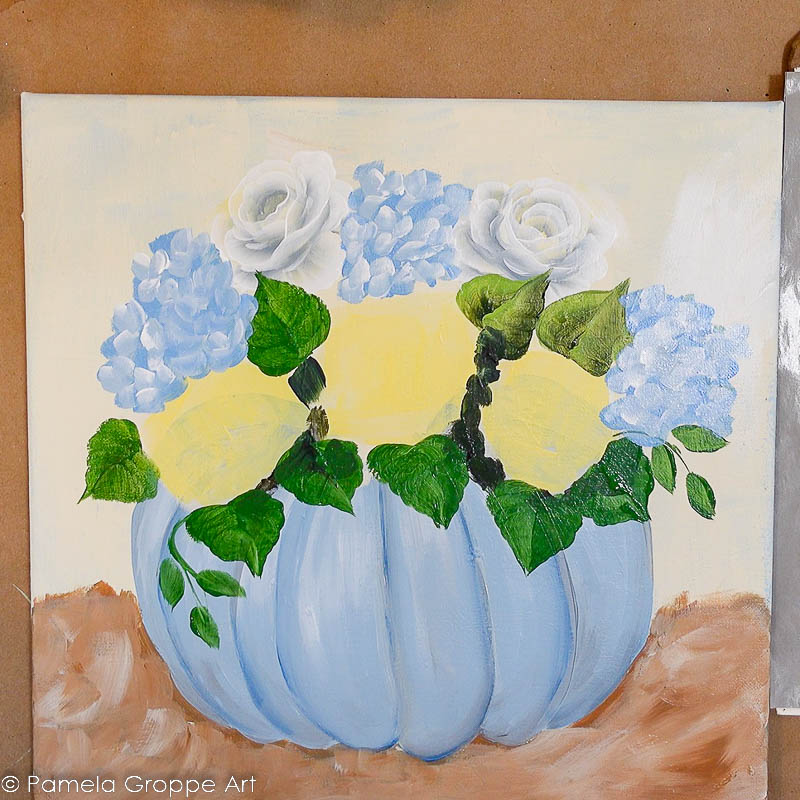
I have more Hydrangea Painting tutorials and in many, I use a filbert brush but I love the chunky feel of these created with the flat brush.
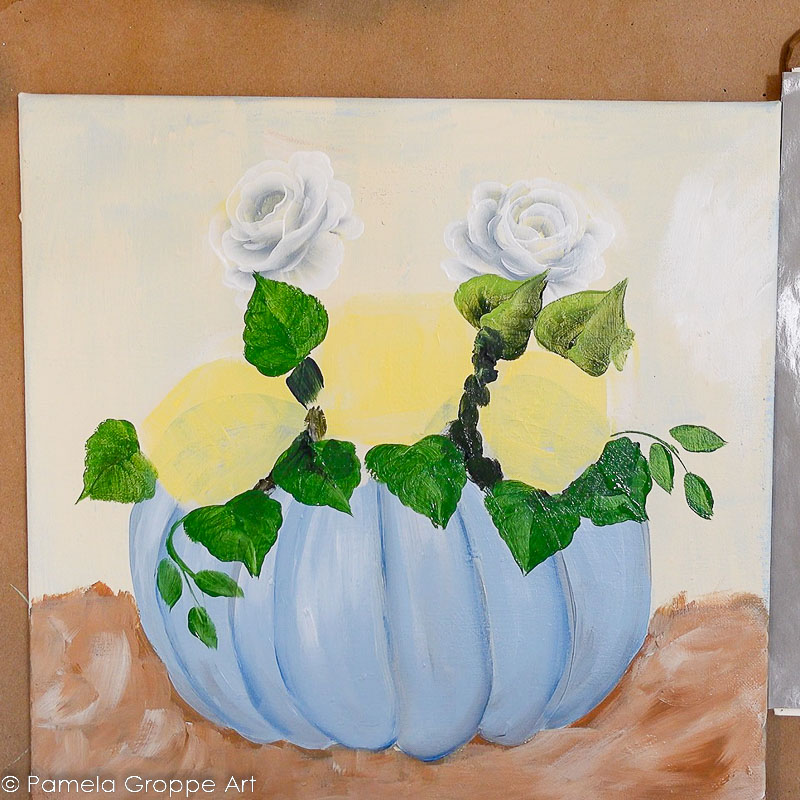
Paint Leaves
Now it is time to go back over the leaves. Using the #12 flat brush double load with Thicket and Fresh Foliage.
If you aren’t sure what a double load is please see the lesson Basic Brush Strokes.
Paint over the leaves, this gives them better opacity.
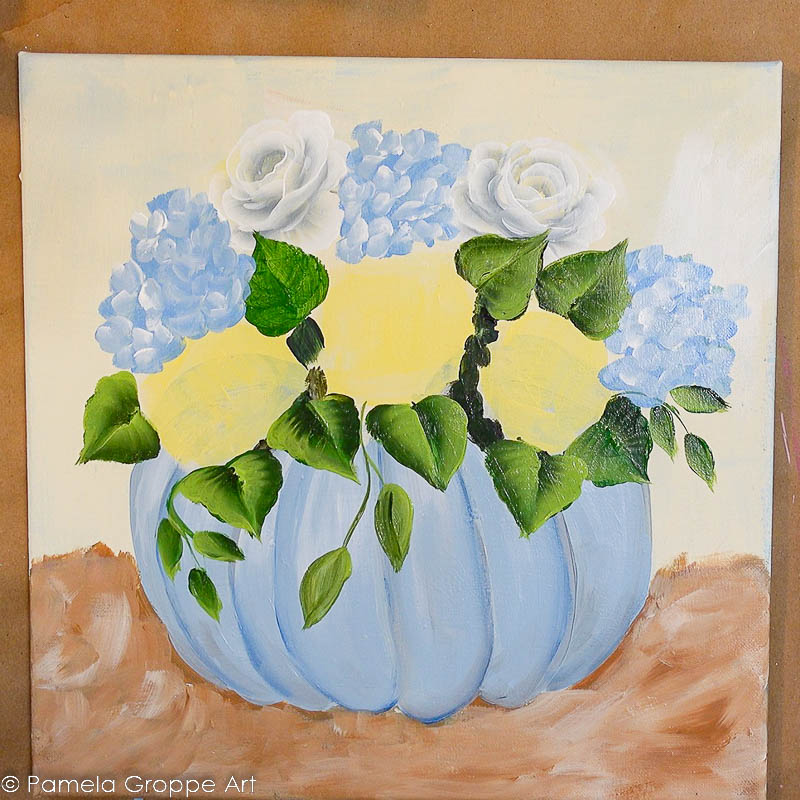
Undercoat White Roses
Before painting the lower white roses use Titanium white to paint a base over the areas around the edges of the roses where the petals may overlap the darker areas like leaves.
This helps to create opacity and brightness. If you did not base these areas the darker paint underneath will show through more than I prefer.
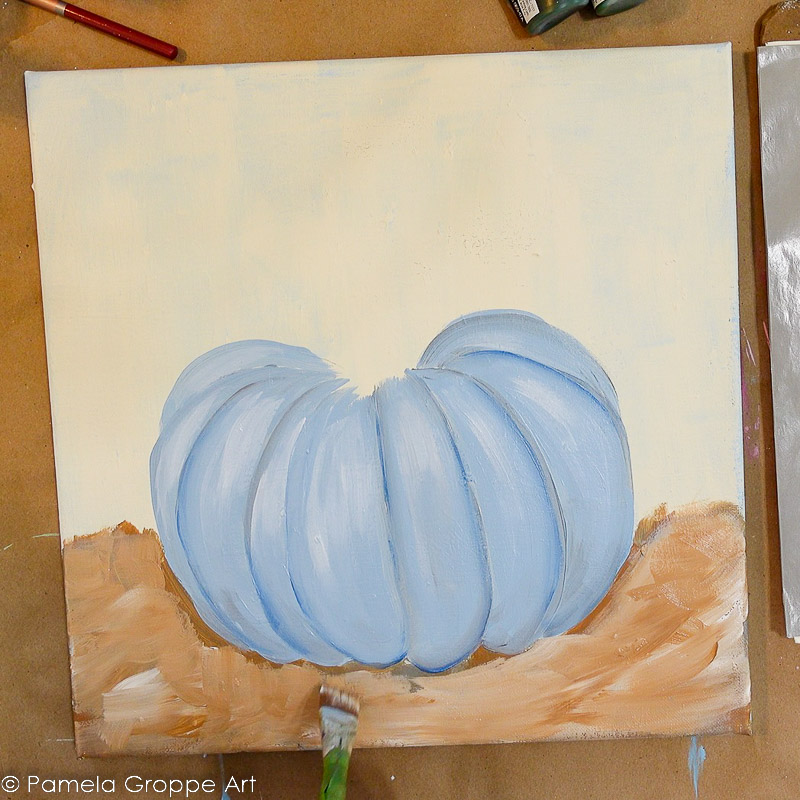
Paint Pumpkin Shadows
While the underpainting of the roses is drying this is a great time to add a bit of shadow beneath your pumpkin.
Using the 3/4″ flat brush double load with some glazing medium, water or floating medium and Burnt Umber.
Blend it into the brush well then pat and stroke it around the bottom edge of the pumpkin.
The Burnt Umber should fade off on the outside edge and not be a hard line.
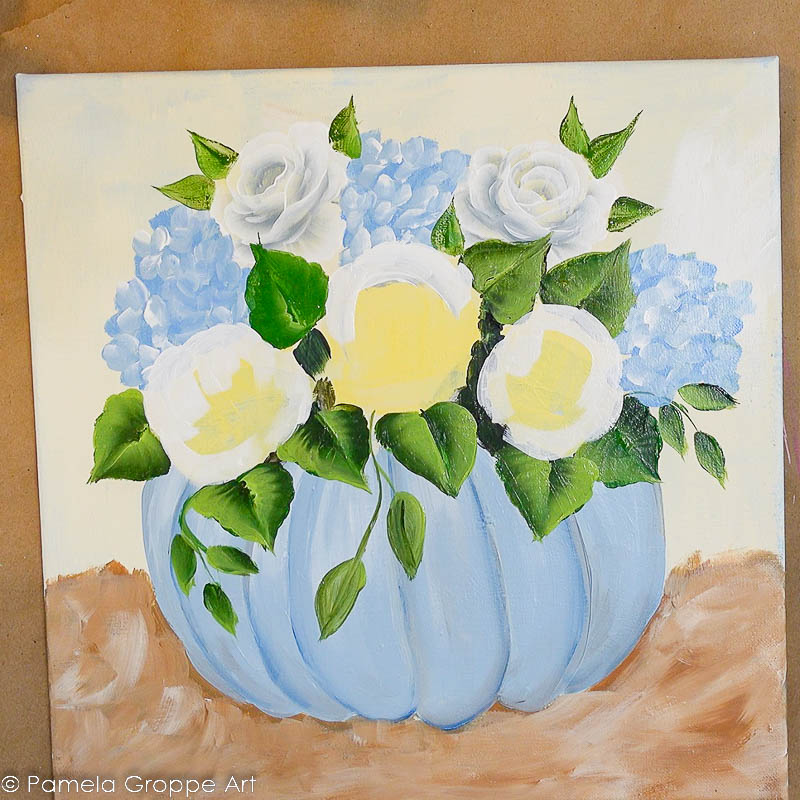
Paint White Roses
Finish painting the larger White roses the same as the upper ones but this time use the #12 flat brush.
Note how the far right lower rose has a much tighter center, it is a good idea to vary the strokes on your roses to make each one unique.
With the Medium Blue and the #12 flat brush pat in some petal strokes where the hydrangeas emerge from beneath the roses, this mimics a touch of shadow which pushes the hydrangeas backward to the eye.
Hydrangea petal centers
Using a liner or stylus dip into some of the Fresh Foliage or Classic Green paint and add dots to the center of some of the individual blossoms of the hydrangeas.

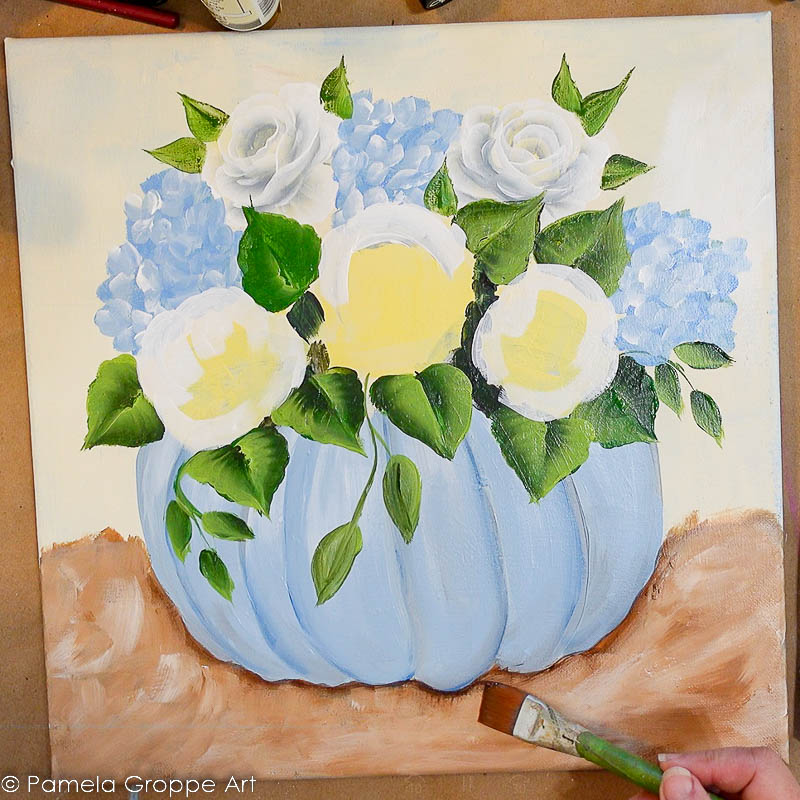
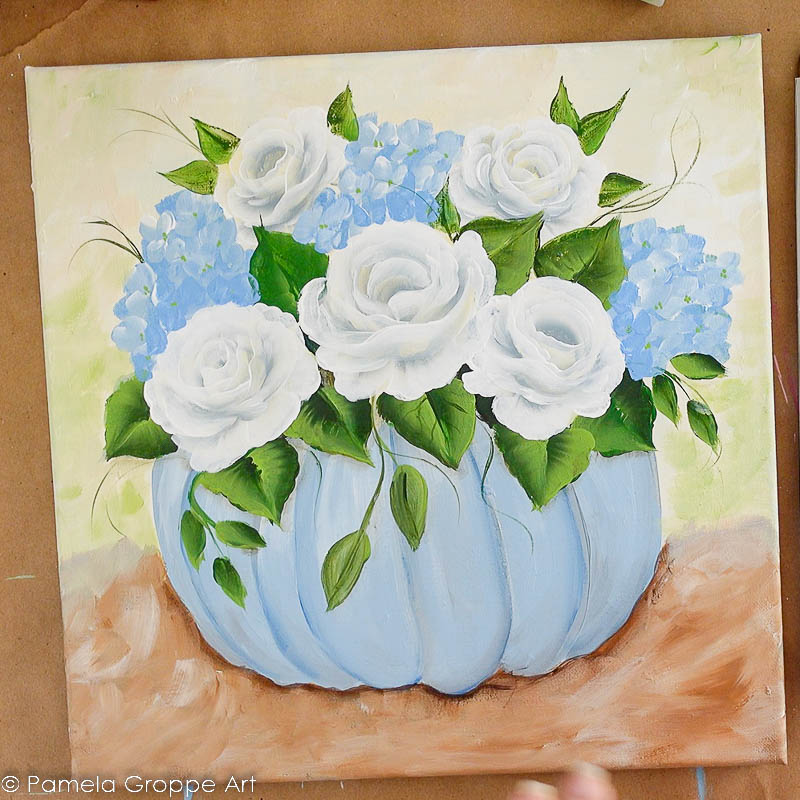
Paint Tendrils and Vines
Make some Thicket green inky in consistency by adding some water. Drag the liner brush through the inky paint and load the brush.
Using light pressure loosely pull tendrils and vines from various points on the composition. Remember to move your entire arm to keep them loose.
Finish
Once your painting is thoroughly dried apply a gloss varnish to really make the colors pop. I like to wait at least 24 hours before varnishing.
This is my preferred varnish, you can find it here.
Liquitex High Gloss Varnish
Paint a Blue Pumpkin and White Roses video
For the workbook version of this post click on the button, it includes the pattern.
Get the Ad-free version
Paint a Blue Pumpkin and White Roses step-by-step workbook here!
Want a printable version of this tutorial that is ad-free and is yours to keep?
Just hit the button below and it is all yours.