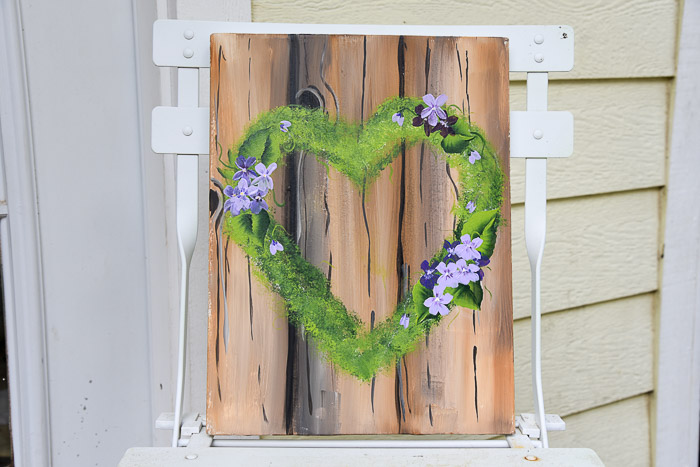
Paint a Mossy Heart Wreath

You can paint a mossy heart wreathe for Spring decor. A fast and easy painting tutorial in acrylics.
I got the idea to paint a mossy heart wreath when I was creating my faux wood grain painting tutorial. I just thought it would make a fun Spring painting project.
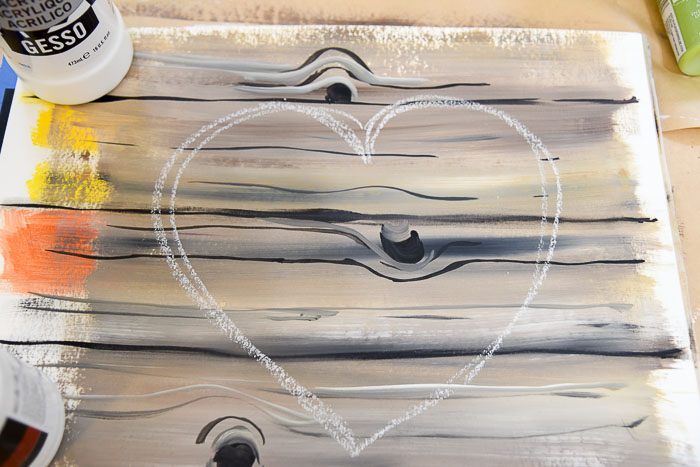
You can paint the faux wood finish on paper, canvas or a painted board. Once it is dry, draw your heart shape chalk to give yourself a guideline.
In the painting video at the end of this post I show the wood grain going vertically and in the photos I have it going horizontally. The choice is yours.
This post contains affiliate links. If you make a purchase after clicking a link I may make a small commission at no added cost to you.
Underpainting of Heart Wreath
Using the larger scruffy brush in the Plaid Folk Art Donna Dewberry brush set tap on a white undercoat. You can use a sponge to do this but that is messier than I like, the scruffy brush does a fine job.

Keep your touch light, I got the top part a little thicker than I wanted but it still will work just fine.
Let the white dry. Clean your scruffy brush well (scruffy brushes don’t behave for me when they are damp) or use a different scruffy for the next step.
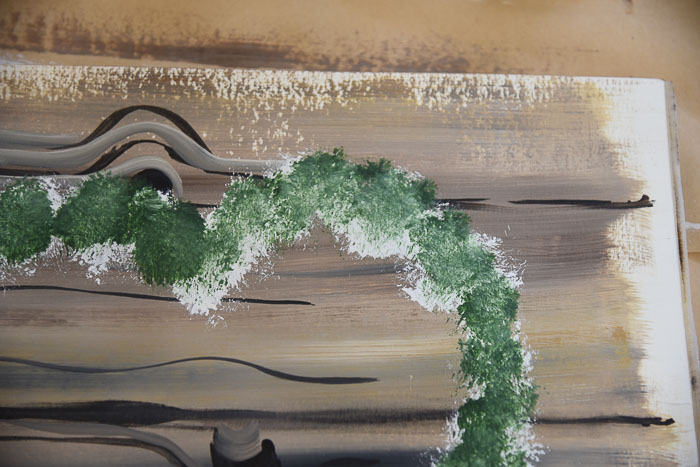
Add greens to wreath
Tap in the Thicket, dark green color over the white.
It does not need to be perfect nor do you need to cover the white completely. You want some white showing to be the under color for the lighter green.

See how the green started to blend with the white, that is because that section was not dry yet. I did not let this bother me but it is not what I wanted, next time I will be sure to let the white undercoat dry completely before continuing on.
Next repeat with the Citrus Green, lighter green. This is the main color I want to shine on this wreath, the other two colors were to just give this one dimension and vibrancy.
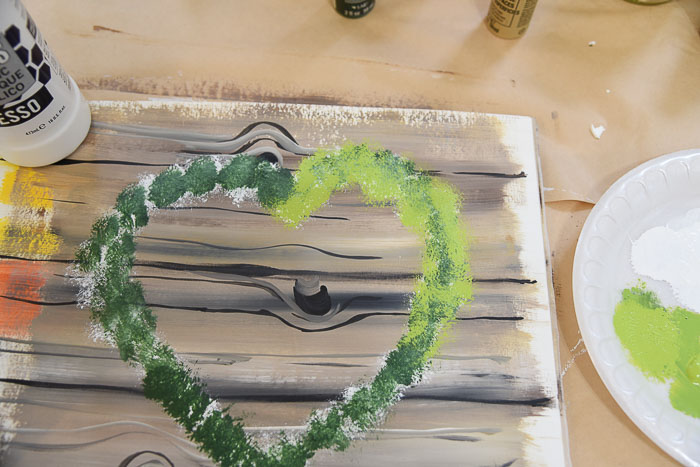
Go all the way around the heart wreath with the Citrus Green. Keep it light, you want the Thicket to peek through but do cover the Wicker White.
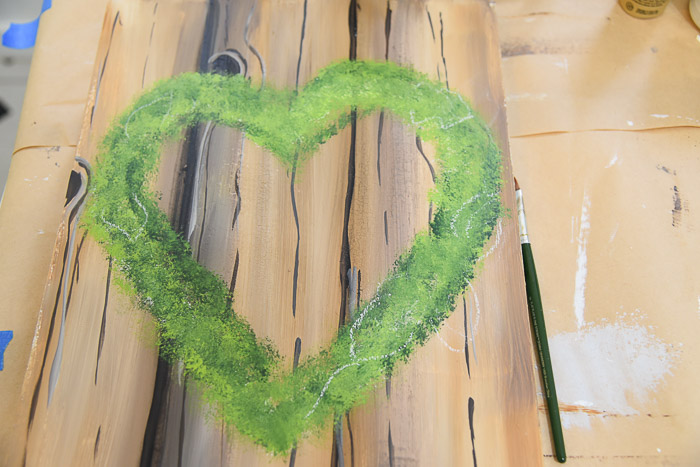
Chalk in the Design
Once dry use chalk to sketch where you want to paint the violets. I am not precise nor will I necessarily stay within these lines, they just give me an idea of composition.
Paint Leaves on the Mossy Heart Wreath
I start by painting my leaves. Want a more detailed tutorial on painting leaves, just click here.
Using a #12 flat brush and double loaded with the Citrus Green and Thicket paint on the leaves. You can still see the chalk lines, no problem I just rub them off with my fingers.

Paint flowers on the wreath
Now paint on the violets (or flowers of choice). In the video you will see I started with a darker purple for the back setting violets, then added the lighter violets on top.
I have a complete How to Paint Violets post that shows you 2 different ways to paint violets that is a more detailed lesson.
For different flowers you may prefer to paint on this wreath try Paint a Pansy, or Paint a Simple Daisy
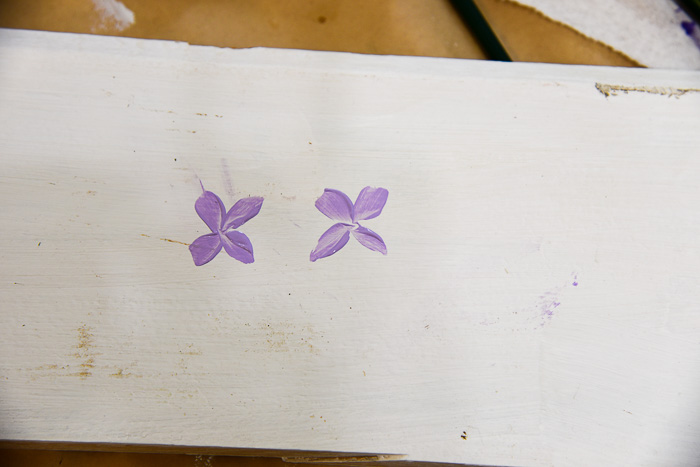
Paint Quick and Simple Violets
Put a dot as a center point to come to with you strokes, paint 4 petal strokes to create a sort of X. Wild violets or dog violets have bottom petals that go downward and not straight out to the sides. They don’t need to be perfect. (I say that a lot)
You my find this post helpful for learning Basic Painting Strokes.
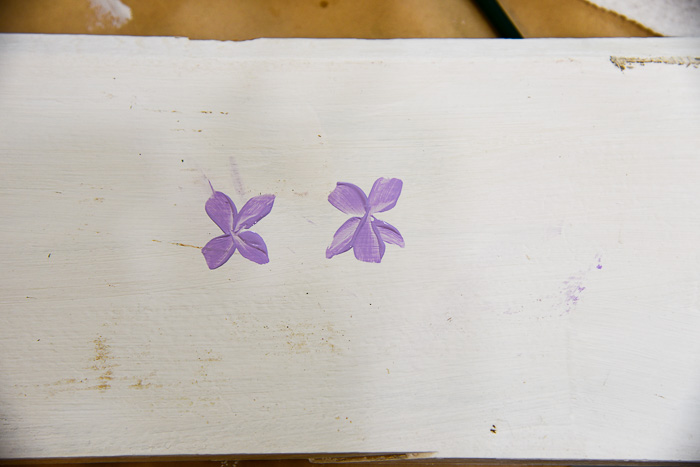
Now add the center bottom petal with a bit more pressure to begin with to create a wider petal.
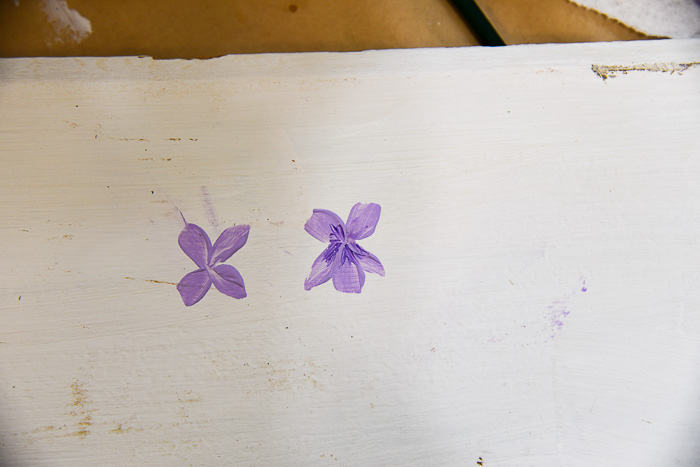
Add the details with a good liner brush and the Perfect Purple. (a darker purple)
Paint the violets in layers on your mossy heart wreath. Darker to the back and lighter to the front.

I added an upside down V to the centers in Wicker White with the liner brush for added detail on the lavender violets and the upside down V on the darker purple violets is in Lavender not white.
Finishing Up
Paint the violets on the rest of your wreath, and add some buds and vines too. The buds are included in the entire dedicated to painting Violets I linked to earlier in this post.
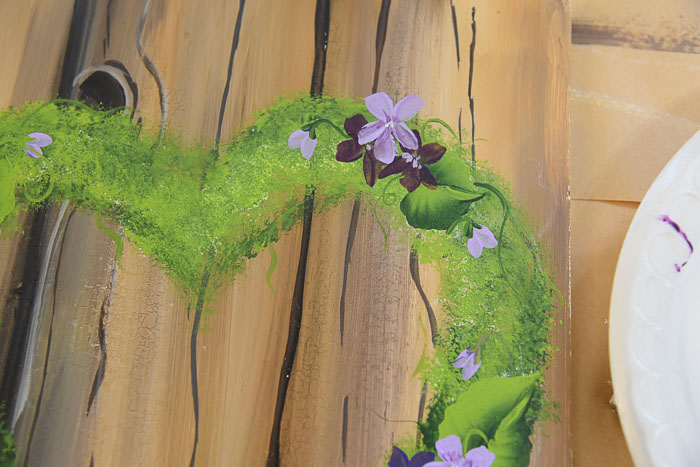
Before you know it you will have a lovely wreath to hang anywhere you would like.
Give it a good coat of varathane, I have the one I like the best listed in my Basic Painting Supplies post.
More flower lessons you can paint on your Mossy Heart Wreath, How to Paint Lavender or you can paint Pretty Pink Roses.
Supplies:
Plaid FolkArt Multi Surface Paints (available at most hobby supply stores)
Wicker White
Thicket
Citrus Green
Light Lavender
Perfect Purple
This post is essential to long brush life, I mentioned this in my video How to Care for you Brushes for long life.
Please PIN and Share

Supply list and brief instructions
Paint a Mossy Heart Wreath with Violets
Step by step painting lesson on painting a mossy heart wreath with violet flowers
Materials
- Plaid FolkArt Multi Surface Paints (available at most hobby supply stores)
- Wicker White
- Thicket
- Citrus Green
- Light Lavender
- Perfect Purple
Tools
- Donna Dewberry Brushes
Instructions
- Paint faux wood background(optional)
- Sketch Heart with chalk
- Using pouncer brush undercoat heart with Wicker White
- Let Dry
- Using pouncer Go over with Thicket (dark green)
- Let Dry
- Pounce on Citrus Green (light green)
- Let Dry
- Sketch on leaves and violets with chalk
- Paint leaves with #12 flat brush
- Use #6 or #8 flat brush to Paint violets in layers (a filbert will work too)
- Finish with details of buds and vines
- Enjoy
Notes
Use brushes to suit the size of your design, this can be made larger or smaller easily.
Recommended Products
As an Amazon Associate and member of other affiliate programs, I earn from qualifying purchases.

Happy Painting!


Really pretty. You make it so easy to follow your steps. Thank you.