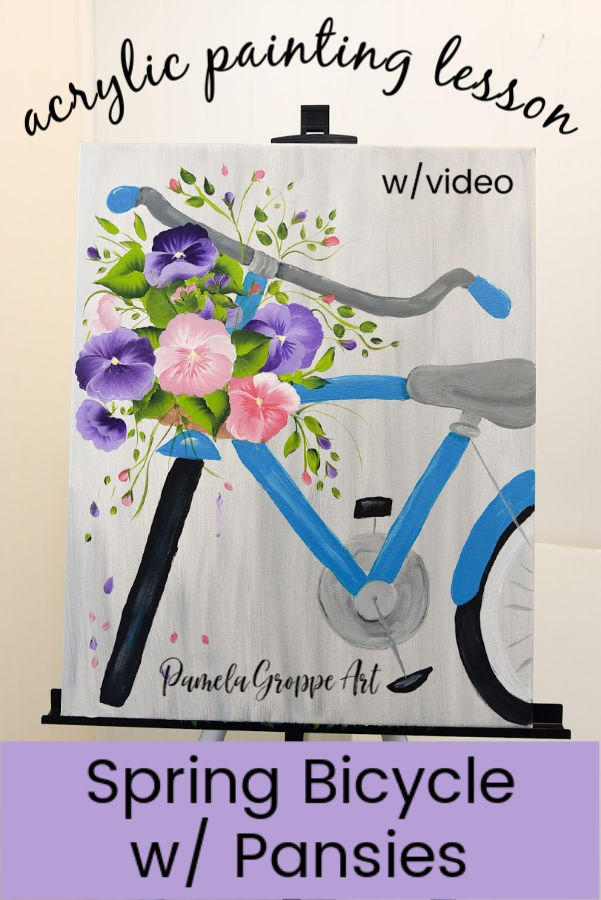
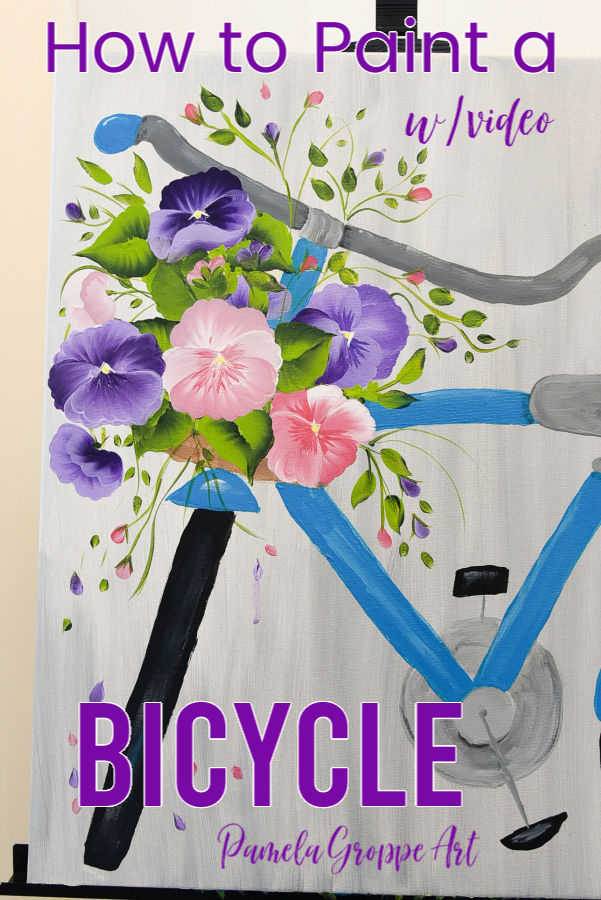
Spring Bicycle Painting with Pansies

This acrylic painting tutorial of a Spring bicycle with pansies comes with a free pattern. Easy step by step canvas painting lesson to welcome Spring!
This acrylic painting lesson is easy enough for beginners and takes you step by step. Be sure to watch the video linked at the end of this post for even more information.
Though we once again have snow on the ground I want to welcome Spring with you by sharing this new acrylic painting lesson.
The video is a long one but it has loads of details that makes this Spring Bicycle painting with pansies extra special.
This post contains affiliate links. If you make a purchase after clicking a link I may make a small commission at no added cost to you.
The printable pattern is located in the Resources library and if you are already a subscriber there is no need to sign up again. Your password is in your latest email from me at the bottom.
If you have yet to subscribe there is a form to fill out to do so further down in this post.
The pattern fits on a regular sheet of printer paper or you can enlarge it using this method listed here: How to Enlarge Painting Patterns
Don’t want to have to enlarge the pattern yourself, a PDF pattern in the 16 x 20 size is available here.
Acrylic paint Supplies
You can use colors of your own choice. Listed below is the colors I used in the tutorial. If you cannot find a particular color at your local hobby store then go here: Plaid Online
Plaid Folk Art acrylics:
Classic French Gray
Steel Grey
Wicker White
Cayman Blue
Licorice Black
Purple
Light Lavender
Graffiti Pink (darker pink)
Plantation Rose (soft mauve pink)
Ivory White (optional, you can use Wicker White)
Dioxazine Purple (optional you can use Purple)
Thicket
Citrus Green
Floating medium or Glazing medium
Brushes:
Royal Majestic flat
Royal Majestic filbert
You can find them here too: Royal Langnickel
You can also use: Donna Dewberry One Stroke Brushes
Paint a Spring Bicycle with Pansies in Acrylics

How to Paint a Spring Bicycle with Pansies in Acrylics, a step by step painting tutorial.
Beginner friendly paint lesson with a bicycle and pansies in the basket.
Materials
- Plaid Folk Art acrylics:
- Classic French Gray
- Steel Grey
- Wicker White
- Cayman Blue
- Licorice Black
- Purple
- Light Lavender
- Graffiti Pink
- Plantation Rose
- Ivory White (optional, you can use Wicker White)
- Dioxazine Purple (optional you can use Purple)
- Thicket
- Citrus Green
- Floating medium or Glazing medium
- Surface:
- 16 x 20 canvas (Michaels)
Tools
- Brushes:
- Royal Majestic flat
- Royal Majestic filbert
- You can find them here too: Royal Langnickel
- You can also use: Donna Dewberry One Stroke Brushes
Instructions
- Paint Background
- Transfer Pattern to Surface
- Paint handlebars with Classic French Gray
- Paint Bicycle frame in Cayman blue
- Add highlights using a touch of Wicker White
- Paint Bicycle seat with a mix of Classic French Gray and Wicker White
- Paint tires with Licorice black
- Add gears and pedals (this can be done before painting bike frame)
- See Next post for painting pansies in basket
Notes
This lesson has pansies in the basket but you can use whatever flowers you prefer or colors for the bicycle. Make it uniquely your own!
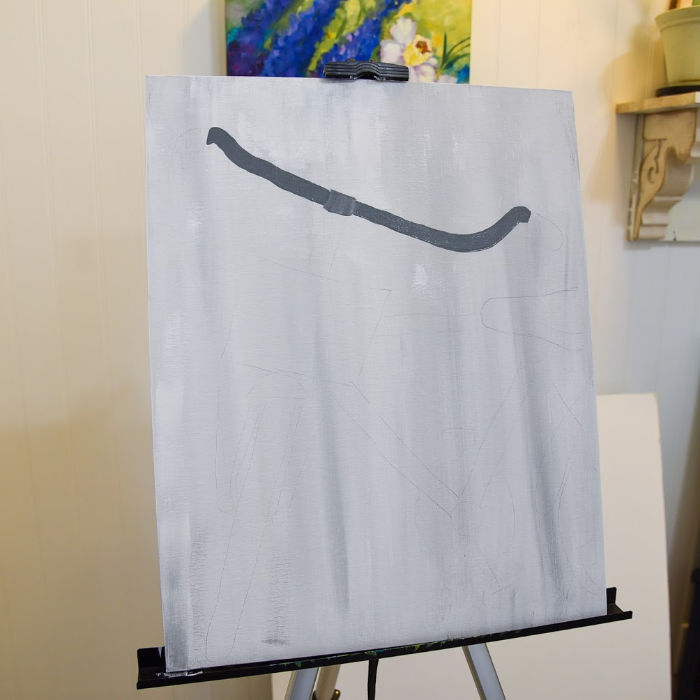
Paint Background
The background I used is a simple neutral background painted on with a sponge. I used Plaid Multi-Surface paints as the sheen it leaves lets your brush move so easily across it as you paint the design.

Here is the complete background painting tutorial with video.
Feel free to use different colors for the background or to paint the Faux barnwood background instead.
Transfer Pattern
The downloadable pattern is the size of regular printer paper, 8.5 x 11.
If you wish to resize it then I have you covered in this post: How to Enlarge Painting Patterns
For your info I enlarged it to 97% to fit the 16 x 20 inch canvas. You can do it in other sizes as you see fit.
Need more info on how I transfer patterns to my surface? See this lesson on transferring painting patterns.
Paint Bicycle Handlebars
Using a 1/2 inch flat brush and Classic French Gray paint the handlebars of the bicycle. The brush size fits just about perfectly the width of the design.
The center juncture is painted using a touch of Wicker White added to the gray. Use a slight C stroke to give the impression of a curve.
Need help with Basic Strokes, find more info here.
Begin Painting Bicycle Frame
Switch to a 3/4″ flat brush if you wish or you can keep using the 1/2″, load with Cayman Blue and stroke in the bicycle frame. The 3/4″ brush just about is the same width as the pattern.
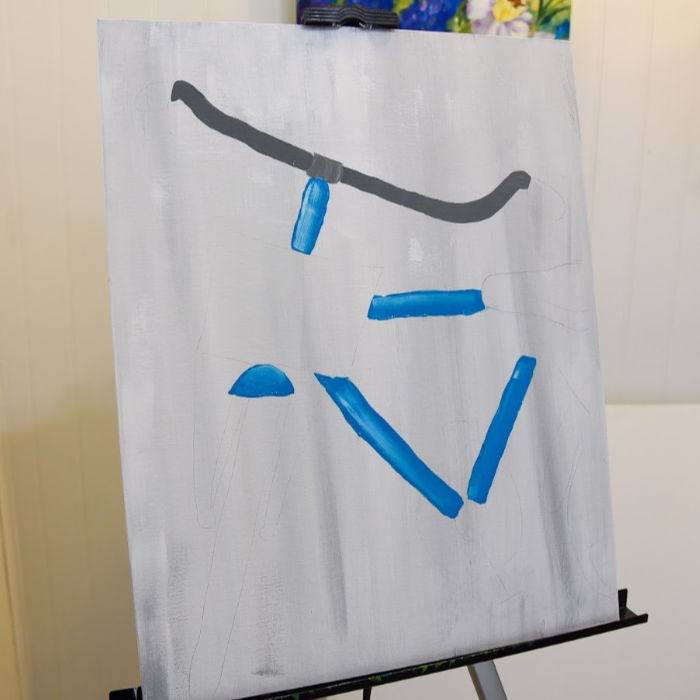
I failed to do the back fender but I do it later, it doesn’t really matter at this point but if you wish to paint it in now you can certainly do so.
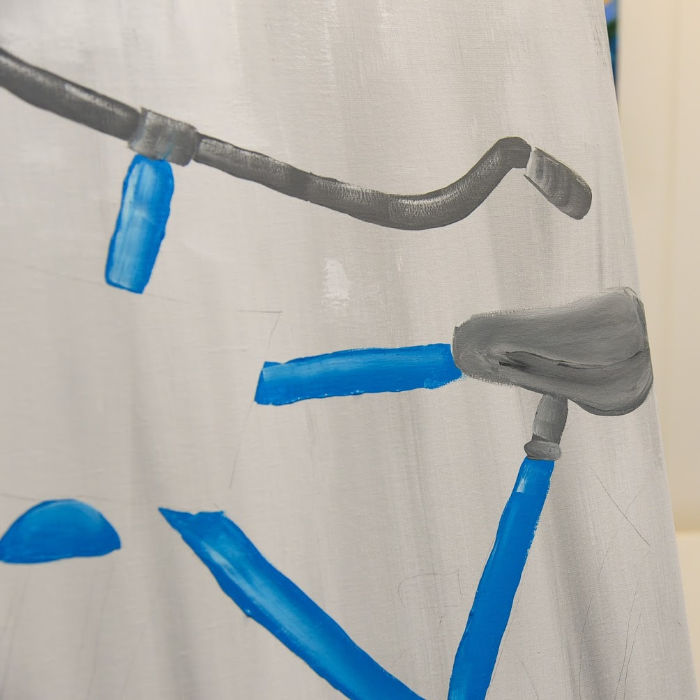
Paint Highlights
You can let the paint dry before adding highlights or do it wet on wet. I prefer dry brushing them on so they don’t blend in.
Using a touch of Wicker white on your brush add some highlights to the handlebars and bicycle frame.
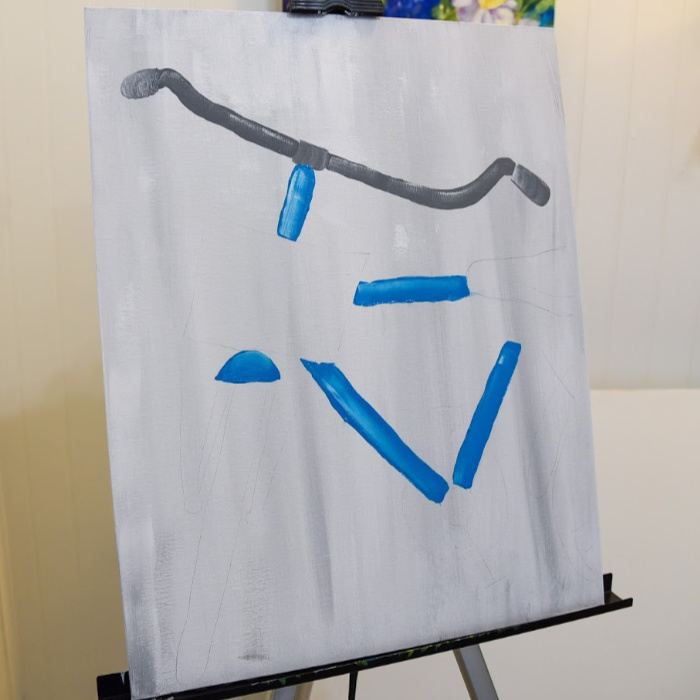
In this photo step by step I painted the end caps of the handlebars with Classic French Gray mixed with Wicker White but in the Video I chose Cayman blue. You can do either.
Paint Bicycle Seat
The bicycle seat is painted in with Classic Gray. Then mix a touch of wicker white to the gray and go over it. Leave it streaky.
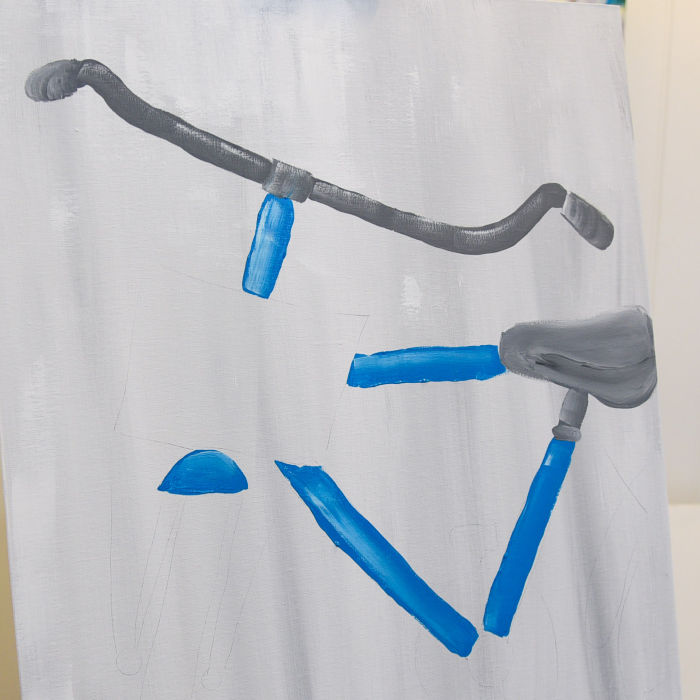
Paint the part under the seat just like the handle bars, mix in a bit of wicker white. The knob between the section below the seat and the frame is painted in an oval then highlighted a touch.
Restate the shadow on the seat, follow the curve of the seat.
In the photo above you can see the difference between the highlights dry brushed on (handlebars) and the highlights painted while the paint was still wet. (bicycle frame)
Paint Tires
Your bicycle is coming together! Isn’t this fun. Now lets paint the tires. I struggle to keep mine round so thankfully the front tire is facing us and is more of a line.
Using Licorice and the 3/4 inch brush paint in the front tire. Give the bottom a slight curve
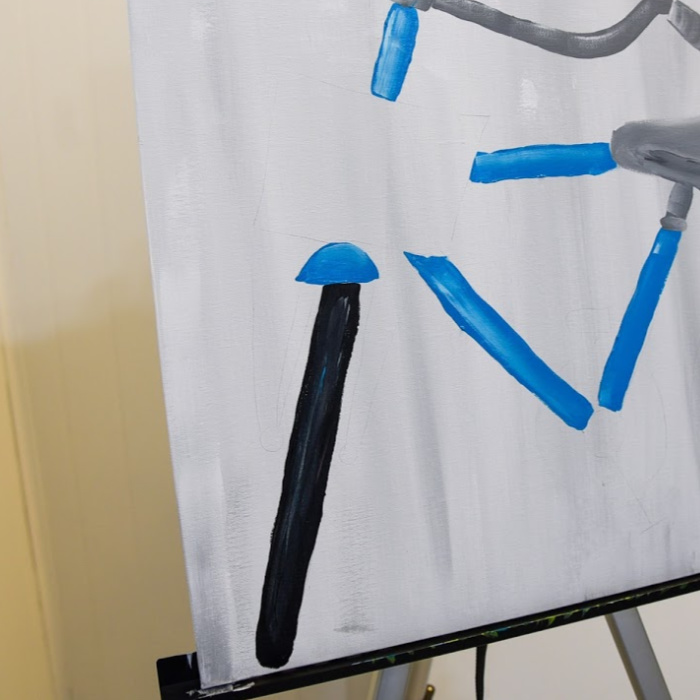
Add some highlights in the center to create more of a rounded effect.
Now on to the back tire. Using Licorice black paint the back tire.
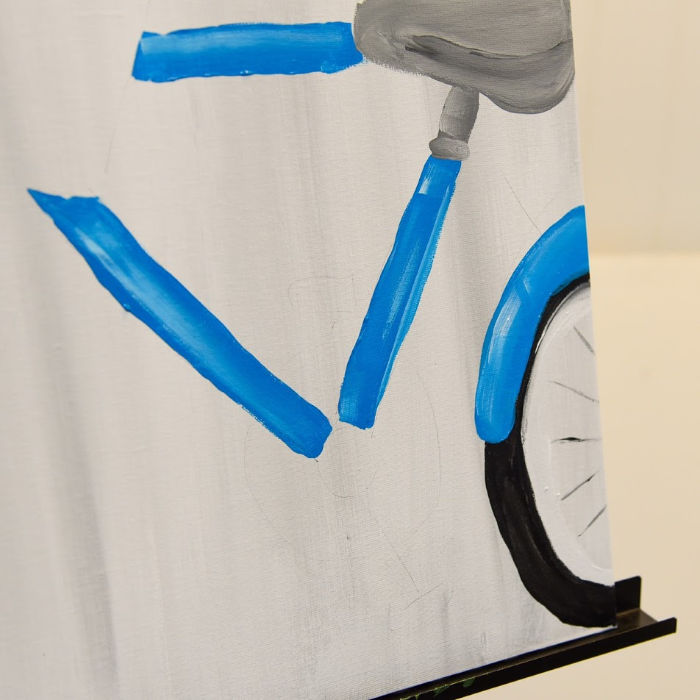
You will note mine looks a bit lumpy. I can easily fix that with a liner or a paint pen later if it is too distracting but it is no big deal if I left it.
With wicker white paint a trip along the inside of the tire, then with the chisel edge of your brush and Licorice paint in indications of spokes.
Add petals and Gear
As noted in my video I really should have painted these before painting the bicycle frame but adding it in now is no big deal.
Using some Classic Gray and Wicker white fill in the outer circle with streaky paint. (means just stroke in lightly, no need for solid coverage), then add more white and paint the inner circle.
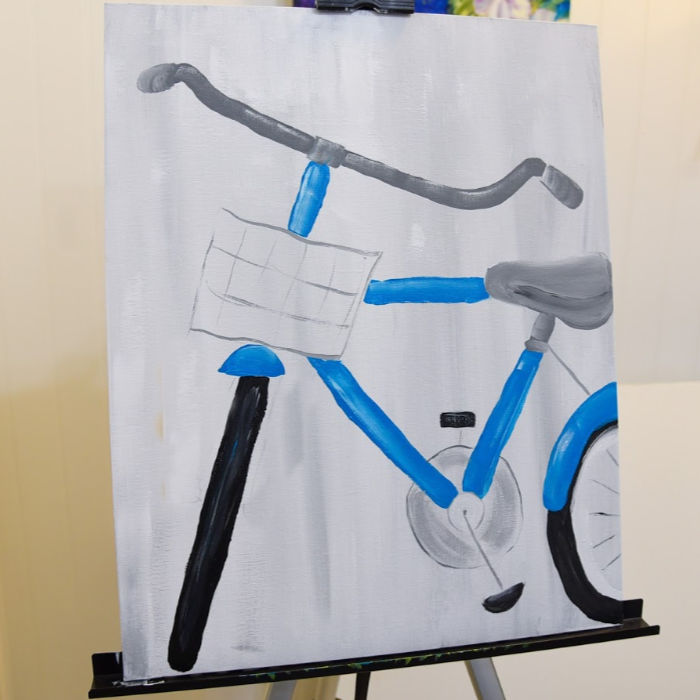
Using Licorice fill in pedals and then highlight with Wicker white. I sketched in the basket with the chisel edge of the brush.
In the video I show how to create a bit of a Wicker Basket but if you want a more detailed lesson see this post Painting a Basket of Pansies.
To gain access to the Resource library and receive email updates of the latest painting tutorials fill out the form below.
For the sake of easier loading on Mobile Devices the Pansy portion of this painting tutorial will be in the next post.
Please PIN and share
For another free bicycle painting lesson that is perfect for Spring see Tracie’s version here. It’s really cute.
Happy Painting!

Hi Pamela – Your Spring Bicycle Painting With Pansies is adorable! Thanks for sharing!
Hello
thanks